WordPress is one of the most popular content management systems in the world, used by millions of websites. It provides users with a powerful platform to build websites, blogs, and online stores with ease. One of its most critical features is the Media Library, where users can upload, manage, and use various types of media files, such as images, videos, and documents.
However, like any system, it comes with its challenges. A common issue many WordPress users face is WordPress media files went blank, where images or thumbnails in the Media Library appear as empty placeholders. This problem is especially noticeable with WebP files, leading to errors such as WebP images blank in WordPress Library or WordPress WebP uploads blank. When this happens, users may struggle to manage their media content efficiently.
This blog will explore the WordPress Media Library, the reasons behind blank images, and effective solutions to fix them.
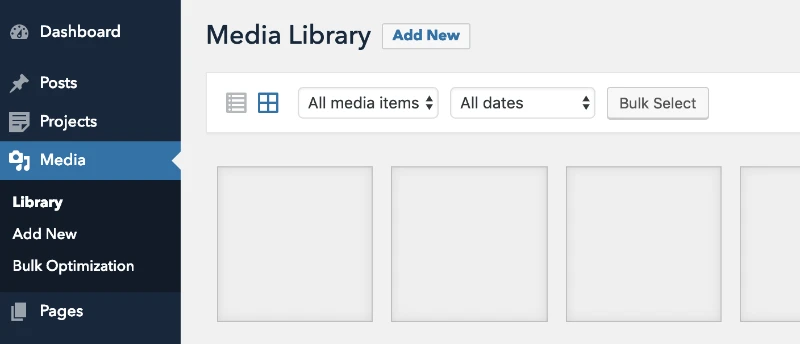
Blank Thumbnails in the Media Library
One of the most frequent problems users encounter in the WordPress Media Library is blank thumbnails. Instead of seeing a preview of an image or video, users are met with an empty gray or white square. This issue can be frustrating, especially when you rely on visual cues to select the right file.
Why Does This Happen? Blank thumbnails often occur because WordPress relies on generating smaller thumbnail images of your uploads. These smaller versions are used in the Media Library for quicker loading and easier navigation. If WordPress fails to generate these thumbnails for any reason, the images may appear as blank placeholders. The root causes might include:
-
File Permission Errors: If your server settings don’t allow WordPress to read or write files properly, it won’t generate thumbnails.
-
Corrupted or Missing Files: If the original image files are damaged or missing, thumbnails won’t appear.
-
Broken Links: After a website migration, the file paths might break, causing thumbnails to disappear.
-
PHP Memory Limit: WordPress relies on PHP scripts to handle images. If the memory limit is too low, it may fail to process larger files.
Step-by-Step Solutions to Fix Blank Thumbnails
Check File Permissions
File permissions control who can read, write, and execute files on your server. In WordPress, correct file permissions are critical for ensuring that the system can access and manage media files properly. When permissions are set incorrectly, WordPress may fail to generate or display thumbnails in the Media Library.
Permissions are typically represented as a three-digit number (e.g., 644 or 755), with each digit indicating the level of access for different user groups. For WordPress, the recommended file permissions are:
- Files: 644 (read and write for the owner, read-only for others).
- Folders: 755 (read, write, and execute for the owner, read and execute for others).
Then how to check and correct file permissions:
-
Access Your Server via FTP or cPanel: Use an FTP client like FileZilla or log into your hosting account\u2019s file manager via cPanel. Navigate to the
wp-content/uploadsdirectory, as this is where your media files are stored. -
Check Current Permissions: Right-click on any file or folder and select “File Permissions” or a similar option. Look for the current permission settings (e.g., 600, 777, etc.).
-
Set Correct Permissions: For files: Change the permissions to 644. For folders: Change the permissions to 755. Apply these settings recursively to ensure all subfolders and files have the correct permissions.
-
Verify the Changes: Refresh your Media Library to check if the thumbnails are now displaying correctly.
Regenerate Thumbnails
When you upload an image to WordPress, the system automatically creates multiple resized versions of the image, known as thumbnails. These different sizes are used across your website, depending on the layout or theme requirements. If these thumbnails are missing or corrupted (due to theme changes, plugin updates, or file migrations), regenerating them means reprocessing the original images to recreate all necessary thumbnail sizes.
This process can restore missing thumbnails in your Media Library and ensure that images appear correctly on your site.
Using Plugins to Regenerate Thumbnails: One of the easiest ways to regenerate thumbnails is by using a dedicated WordPress plugin. Plugins automate the process and save you time, especially when dealing with large media libraries.
-
Install and Activate the Plugin: Go to your WordPress dashboard, then navigate to Plugins > Add New. Search for “Regenerate Thumbnails” and install the plugin by Alex Mills. Once installed, click Activate.
-
Access the Plugin Settings: Navigate to Tools > Regenerate Thumbnails in your WordPress admin menu.
-
Regenerate All Thumbnails: You’ll see an option to regenerate thumbnails for all images in your Media Library. Click Regenerate Thumbnails for All Attachments. The plugin will start processing, and you’ll see a progress bar. This might take some time, depending on the size of your library.
-
Verify Results: Once the process is complete, check your Media Library to confirm that the blank thumbnails are resolved.
Check for Corrupted Image Files
Corrupted image files can lead to the Blank Image issue in WordPress. If certain images in your WordPress Media Library show up as a blank image, the files may be damaged. To identify corrupted images:
-
Inspect Images in the Media Library: Go to Media > Library in the WordPress dashboard. Switch to the list view to see image details such as file size, type, and dimensions. Look for images without a preview or ones showing a file error message.
-
Download and Test the Image Locally: Download the affected file to your computer. Open it with an image viewer or editor (e.g., Preview, Photoshop, or Paint). If the image doesn’t open, it’s likely corrupted.
-
Check File Size and Type: Corrupted files might have an unusually small size or unsupported formats. Ensure the file is a supported type like JPEG, PNG, or GIF, and the size is reasonable (not 0 KB).
Steps to Replace or Fix Corrupted Images: If you’ve identified a corrupted image, here’s how to fix or replace it:
-
Reupload the Original File: Locate the original, uncorrupted image on your local device.
Reupload it to the Media Library by going to Media > Add New.
-
Convert to a Supported Format: If the file format is unsupported, convert it to a compatible format (e.g., from WebP to PNG or JPEG) using an online converter or image editing software.
-
Repair the Image: Use online tools like Photopea or software like Photoshop to open and re-save the corrupted image file.
-
Replace Broken Images in Content: Update posts or pages using the affected images to ensure they point to the new, working file.
-
Delete the Corrupted File: After replacing the image, delete the corrupted file from the Media Library to prevent confusion.